
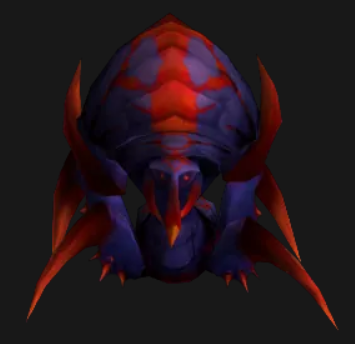
 Buru the Gorger is a boss found inside Ruins of Ahn'Qiraj. During the battle, an arbitrary attack part will get engaged and that player must kite him around to the different eggs in the room, devastating the egg when he is close to it, bringing about the boss taking damage. Rehash until he arrives at 20%, which you would then be able to pop all cooldowns and zero in on the boss to torch him. Buru the Gorger's drops incorporate Buru's Skull Fragment, Slimy Scaled Gauntlets, Gloves of the Swarm a few uncommon things, Cenarion Circle covering tokens, books with new spell positions, and then some.
Drop Table
Exclusive
Buru's Skull Fragment, Gloves of the Swarm, Slimy Scaled Gauntlets, Fetish of Chitinous Spikes, Slime Kickers, Scaled Bracers of the Gorger, Quicksand Waders
Cenarion Tokens
Qiraji Ornate Hilt, Qiraji Spiked Hilt, Qiraji Ceremonial Ring, Qiraji Magisterial Ring, Qiraji Martial Drape, Qiraji Regal Drape
Libram Class Drops
- Druid: Book of Healing Touch XI, Book of Rejuvenation XI, Book of Starfire VII
- Hunter: Guide: Aspect of the Hawk VII, Guide: Multi-Shot V, Guide: Serpent Sting IX
- Mage: Tome of Arcane Missiles VIII, Tome of Fireball XII, Tome of Frostbolt XI
- Paladin: Libram: Blessing of Might VII, Libram: Blessing of Wisdom VI, Libram: Holy Light IX
- Priest: Codex of Greater Heal V, Codex of Prayer of Healing V, Codex of Renew X
- Rogue: Handbook of Backstab IX, Handbook of Deadly Poison V, Handbook of Feint V
- Shaman: Tablet of Grace of Air Totem III, Tablet of Healing Wave X, Tablet of Strength of Earth Totem V
- Warlock: Grimoire of Corruption VII, Grimoire of Immolate VIII, Grimoire of Shadow Bolt X
- Warrior: Manual of Battle Shout VII, Manual of Heroic Strike IX, Manual of Revenge VI
 Notable Classes
Despite the fact that Buru's focusing on is arbitrary, classes with development speed capacities like Rogues, Mages, Shaman and Druids have a simpler time kiting Buru around in Phase 1. Hunters can help more slow classes as of now kiting Buru with Aspect of the Pack, yet be cautious with likely stupors. Priests and Shamans can help individuals kiting through profound waters with Levitate and Water Walking. Warlocks can get some underlying damage in Phase 2 by projecting Curse of Doom before the boss really gets underneath 20%. Warriors, Priests and Warlocks can utilize their AOE Fears in Phase 2 to disperse away the new Hive'Zara add produces, and give the attack more opportunity to DPS Buru.
Quick Tips
All Specializations
Ensure you recon the landscape and get a vibe of where the profound waters start and end before the battle begins. In case you're discovered swimming while Buru is after you, there is a decent possibility she will get you. Quickness Potions are exceptionally useful with kiting in this battle.
DPS
DPS can pre-DPS eggs before Buru jumps on top of them, simply ensure you don't leave any DOTs or incidentally kill them before the opportunity arrives. Hive'Zara Hatchlings don't have that much wellbeing and you won't be DPS-ING Buru until she's at 20%, so spare any major cooldowns until her shell breaks.
 Tanks
Tanks
Get Hive'Zara Hatchlings when they generate so they don't chance hitting and stupefying individuals who are kiting Buru. Buru doesn't bargain a great deal of damage with skirmish hits in Phase 2, so you can securely do this battle with your DPS gear.
Healers
Buru's damage will get as the battle goes on in Phase 2, so save mana up to that point and spare any major cooldowns for higher heaps of Creeping Plague.
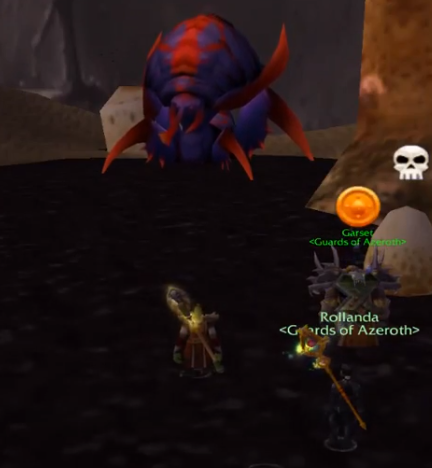
Before the Battle
Try to clear any adds near Buru's foundation before the battle begins, remembering the gigantic slime for the incline prompting Buru. Some assault gatherings will utilize the profound waters to hop down to Buru's territory without slaughtering that overflow, however managing it before the boss battle is a more secure methodology.
Ability and Strategy
Phase 1

During Phase 1, Buru the Gorger will take 99% decreased damage on account of its fortified carapace. Buru will likewise pick an arbitrary objective to pursue around. To bring down Buru's wellbeing, the individual targeted needs to kite her around the room while the strike damages Buru Eggs dispersed over the room. When a Buru Egg has low enough wellbeing, Buru must be kited on top of the damaged egg, and the assault must murder it. In the event that the Egg is effectively killed while Buru is on top of it, Buru will take around 7% of her most extreme wellbeing in damage and be dazed for a couple of moments.
 Once the paralyze is finished, Buru will pick another objective to pursue. Buru is moderate at first while pursuing an objective, yet will pick up speed as the time passes, until getting quicker than move speed around a moment into the kiting. On the off chance that she figures out how to hit her kiting objective, she will Dismember them, a DOT that bargains huge actual damage. To keep this from occurring, the attack should continually plan new eggs to be slaughtered by damaging them while the kiting occurs. Furthermore, every time a Buru Egg is broken, a Hive'Zara Hatchling will bring forth from the egg. These should be gotten by the tank and DPS'D down. This stage will proceed until Buru's wellbeing is brought down underneath 20%. When this occurs, her carapace will break and Phase 2 will begin.
Phase 2

When Buru's carapace is broken, she will have a typical aggro table. Notwithstanding, she doesn't bargain a great deal of scuffle damage, so customary tanks are a bit much (in spite of the fact that you do need her hitting your Plate wearers ideally). She additionally loses her Dismember capacity from Phase 1. Buru's most perilous capacity in Phase 2 is Creeping Plague - Creeping Plague is applied to the whole strike, managing expanding damage each second. The damage begins at 80 every second and duplicates like clockwork (from 80 to 160 to 240, and so on)
As a result of Creeping Plague, your attack has roughly 30 seconds to carry Buru from 20% to dead, so use and misuse your cooldowns to do as such. Healers should bomb the attack with AOE mends once Creeping Plague stacks begin getting ever more elevated. Crawling Plague damage is irresistible and experiences insusceptibilities, yet can be alleviated with Greater Nature Protection Potions. Notwithstanding Creeping Plague, more Hive'Zara Hatchlings begin crawling towards the strike - These should be Feared away from the assault so players can zero in on murdering Buru.
Thank you for reading, cheapest wow gold classic from Mywowgold.com, 365/24/7 online and fast.